I came across this little tidbit while doing some other searches on the web concerning lead generation and cold calling.
If you are a sales person, an affiliate marketer or a job seeker, then you probably want to have your blog posts pop up on Google for certain keywords so prospects can take notice of your expertise.
Here are the variables of concern when you are using Google’s publishing tool, Blogger:
So what you find yourself confronted with is a sales engineering problem.
On the one hand, you can write up a page title with all of your keywords within the first 39 characters. The result will be a page name and a page title that will rank very high for your keywords. However, it will look really ugly to people and your audience will probably be more enticed to click on your competitors’ items instead of clicking your entry. And the title broadcasted in your feeds will not induce people to click and read your post either. So what good does it do to get top billing for your keywords if no one wants to click on your post?
On the other hand, you can write a title that looks really enticing to your reader base and makes them drool with anticipation when they see it. However, such language tends to induce a sense of mystery or incite a sense of shock and awe. Such language needs a little more freedom in word placement. The result is that some of your keywords may be placed beyond of the 39-character limit. Net result, your feeds will look enticing, but your organic placement will stink.
So you see the engineering dilemma. You can have very high placement with a title that doesn’t excite your audience very much, or you can have a title that makes your audience drool with excitement if they are willing to skip over to the 10th page of the search engine results.
So needless to say, when you create your Blogger post pages, you will have a little bit of work in front of you.
Here is another challenge. In Blogger, the title for all of your blog posts is preceded by the blog title!
Take a look at this:
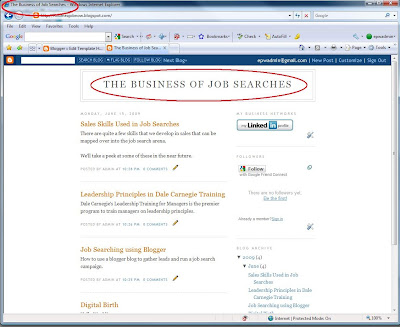
This is a test blog I created on Blogger with the title, “The Business of Job Searches”. Notice up on the title bar of the browser is the title of the page. This is typically the same text that’s in the HTML title tag. It's also what the search engines like Google are looking for when determining search relevance.
Notice what happens when I click on a post.
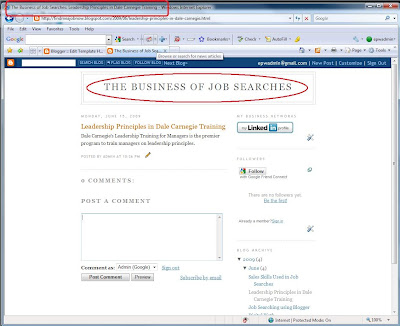
If my keyword is leadership, I should have good organic search results. The word “leadership” is first in my title putting it within the 39 character limit for Blogger page names and way up front in the title. However, notice what is on the browser title bar, “The Business of Job Searches: Leadership Principles in Dale Carnegie Training”
In order to have 100% relevancy as far as the title is concerned, my keywords must appear as the first word of the title. Relevancy will drop to below 60% for keywords that have fallen to the 4th position or further. So the further along in the title a word is located, the less relevant Google considers it. If what I see in the browswer title bar is what’s in my HTML title tag, then I’m in trouble. The relevancy for my keyword, leadership, is going to be below 60%. And it’s all because Blogger places the blog title first before the page title where all of my keywords are located.
I guess there’s some wisdom to having short blog titles.
Turns out that there is a way around this. But you’ll have to do some editing of the HTML that makes up the framework of your blog.
First, get to your Blogger dashboard. As you can see here, I’m back as the ‘EPW Test Dude’ with my blog I created back a few posts ago. Look, it even has 5 posts.
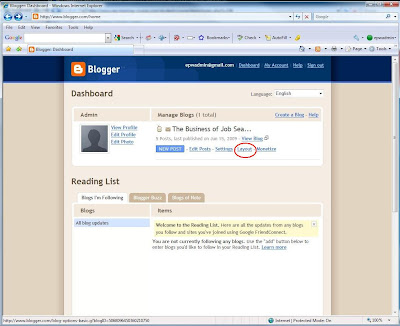
Go to the Layout section:
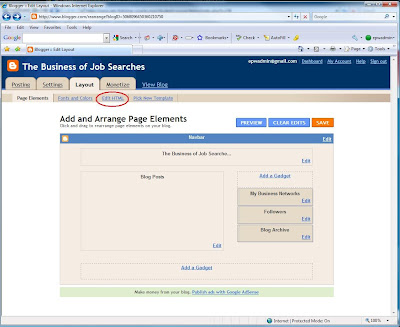
And then to the ‘Edit HTML’ section
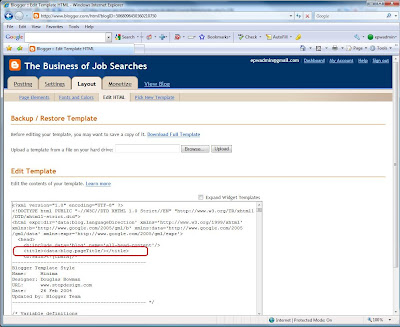
Now you’ll see some pretty ugly stuff. Don’t wig out. The piece that you want to edit is right there in front of you. You don’t have to scroll down or do any kind of search. The piece you want is the following:
This is the piece that essentially writes the blog page title right there in the HTML title tag and puts the title in the title bar of your browser.
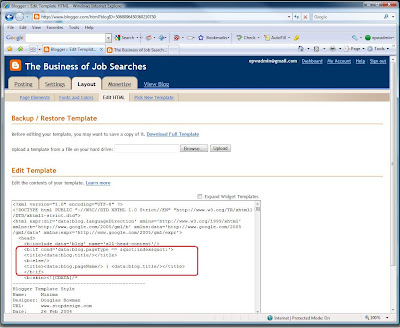
What you want to replace that piece of code with is the following code:
What this piece of code essentially says is, “if the index page is pulled up, also known as the home page or the first page of your Blogger blog, then go ahead and use the blog title in the title of the page and inside the HTML title tags. Otherwise, put the blog post title down first, followed with a "vertical bar" and then with the blog title, stuff all of that inside the HTML title tags and use it as the title of the page.
The result looks like this:
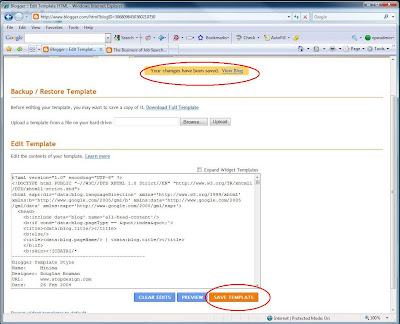
Save the template out by hitting the “Save Template” button below the edit box
Now, when you go look your post, you will see a slight change:
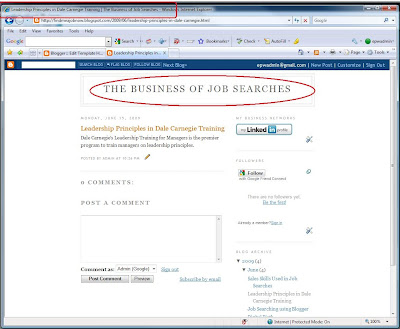
Notice that the blog post title is now first in the title and “Leadership” is now the first word in the title as well as in the page name.
It will take about a week for the results to make their way into the search engines, depending on how often you post and your current traffic. Of course, to increase it relevancy, we’ll have to add some text into the body of the post that has the word leadership. To make it really relevant, we’ll have to add some surrounding text that actually discusses leadership in a way that people find interesting. But for now, celebrate the fact that you now have some power over what’s getting placed in the title tags of your Blogger blog and possibly increasing your organic search results.
Kudos to the guys at Eblog Templates for finding this snippet of code and making it available -- and I’m sure that there are other, more exotic entries out there. I'll let you know as I find them. And I'll keep you updated on what kinds of changes I see in my search results.
If you are a sales person, an affiliate marketer or a job seeker, then you probably want to have your blog posts pop up on Google for certain keywords so prospects can take notice of your expertise.
Here are the variables of concern when you are using Google’s publishing tool, Blogger:
- Blogger uses the title of your post to create the page file name (the piece of the URL that is right that is between the “/” and the “.html”).
- When creating the page file name, Blogger limits the name to the first 39 characters.
- After you save the page out with the first page name, you can change the page title to something more catchy to grab people’s attention but it won’t change the page file name.
- Search engines look for keywords in the post title, the domain name and the page name, so when you first create your Blogger post, you need to have your keywords within the first 39 characters.
- Search engines also determine keyword relevancy by their location in the page title. So you also need to keep your keywords really close to the front of the page title in order to have high relevancy.
So what you find yourself confronted with is a sales engineering problem.
On the one hand, you can write up a page title with all of your keywords within the first 39 characters. The result will be a page name and a page title that will rank very high for your keywords. However, it will look really ugly to people and your audience will probably be more enticed to click on your competitors’ items instead of clicking your entry. And the title broadcasted in your feeds will not induce people to click and read your post either. So what good does it do to get top billing for your keywords if no one wants to click on your post?
On the other hand, you can write a title that looks really enticing to your reader base and makes them drool with anticipation when they see it. However, such language tends to induce a sense of mystery or incite a sense of shock and awe. Such language needs a little more freedom in word placement. The result is that some of your keywords may be placed beyond of the 39-character limit. Net result, your feeds will look enticing, but your organic placement will stink.
So you see the engineering dilemma. You can have very high placement with a title that doesn’t excite your audience very much, or you can have a title that makes your audience drool with excitement if they are willing to skip over to the 10th page of the search engine results.
So needless to say, when you create your Blogger post pages, you will have a little bit of work in front of you.
Here is another challenge. In Blogger, the title for all of your blog posts is preceded by the blog title!
Take a look at this:

This is a test blog I created on Blogger with the title, “The Business of Job Searches”. Notice up on the title bar of the browser is the title of the page. This is typically the same text that’s in the HTML title tag. It's also what the search engines like Google are looking for when determining search relevance.
Notice what happens when I click on a post.

If my keyword is leadership, I should have good organic search results. The word “leadership” is first in my title putting it within the 39 character limit for Blogger page names and way up front in the title. However, notice what is on the browser title bar, “The Business of Job Searches: Leadership Principles in Dale Carnegie Training”
In order to have 100% relevancy as far as the title is concerned, my keywords must appear as the first word of the title. Relevancy will drop to below 60% for keywords that have fallen to the 4th position or further. So the further along in the title a word is located, the less relevant Google considers it. If what I see in the browswer title bar is what’s in my HTML title tag, then I’m in trouble. The relevancy for my keyword, leadership, is going to be below 60%. And it’s all because Blogger places the blog title first before the page title where all of my keywords are located.
I guess there’s some wisdom to having short blog titles.
Turns out that there is a way around this. But you’ll have to do some editing of the HTML that makes up the framework of your blog.
First, get to your Blogger dashboard. As you can see here, I’m back as the ‘EPW Test Dude’ with my blog I created back a few posts ago. Look, it even has 5 posts.

Go to the Layout section:

And then to the ‘Edit HTML’ section

Now you’ll see some pretty ugly stuff. Don’t wig out. The piece that you want to edit is right there in front of you. You don’t have to scroll down or do any kind of search. The piece you want is the following:
<title> <data:blog.pageTitle/> </ title>
This is the piece that essentially writes the blog page title right there in the HTML title tag and puts the title in the title bar of your browser.
What you want to replace that piece of code with is the following code:
<b:if cond=’data:blog.pageType == “index”’>
<title><data:blog.title/></title>
<b:else/>
<title><data:blog.pageName/> | <data:blog.title/></title>
</b:if>
<title><data:blog.title/></title>
<b:else/>
<title><data:blog.pageName/> | <data:blog.title/></title>
</b:if>
What this piece of code essentially says is, “if the index page is pulled up, also known as the home page or the first page of your Blogger blog, then go ahead and use the blog title in the title of the page and inside the HTML title tags. Otherwise, put the blog post title down first, followed with a "vertical bar" and then with the blog title, stuff all of that inside the HTML title tags and use it as the title of the page.
The result looks like this:

Save the template out by hitting the “Save Template” button below the edit box

Now, when you go look your post, you will see a slight change:

Notice that the blog post title is now first in the title and “Leadership” is now the first word in the title as well as in the page name.
It will take about a week for the results to make their way into the search engines, depending on how often you post and your current traffic. Of course, to increase it relevancy, we’ll have to add some text into the body of the post that has the word leadership. To make it really relevant, we’ll have to add some surrounding text that actually discusses leadership in a way that people find interesting. But for now, celebrate the fact that you now have some power over what’s getting placed in the title tags of your Blogger blog and possibly increasing your organic search results.
Kudos to the guys at Eblog Templates for finding this snippet of code and making it available -- and I’m sure that there are other, more exotic entries out there. I'll let you know as I find them. And I'll keep you updated on what kinds of changes I see in my search results.


