
Friday, September 19, 2014
IBM ThinkPad R52 Gets Power But Won't Boot

Wednesday, September 10, 2014
5 Million Gmail Addresses and Passwords Leaked: What This Means for You

Earlier today, news started making the rounds that a list of 5 million Gmail addresses and passwords was leaked on Tuesday, Sept 9 2014.
The list appeared on a Russian Bitcoin forum site and after some review, appears to be the result of a number of years of hacking and phishing campaigns as opposed to a direct assault on the Google mothership.
Some of the accounts also appeared to be quite old, and in some cases the gmail address appeared to be the username for another online account.
So what we are probably seeing is actually some hacker’s private stash rather than someone looking for help in cracking a password database.
Thursday, February 14, 2013
Reviving A Dead Thinkpad Laptop

In that post, I outlined how I had possibly found a solution to my laptop’s unreliable operation.
Unplugging the laptop; pressing the power button 10 times at 1 second intervals; holding it down for 30 seconds… Seemed arcane, but it worked.
At least temporarily.
Tuesday, January 29, 2013
Breathing New Life Into A Dead Thinkpad Laptop
 If you own a Lenovo or IBM ThinkPad laptop, here is a tip I found that you’ll want to keep in your back pocket in case it starts to behave erratically or drops dead completely.
Friday, September 24, 2010
Yahoo Email Shows Viral Behavior

Yahoo Email Virus
Last weekend I received an unusual email from my sister.
She had sent the message to 6 or 7 people, some of them family members. The subject line was something unintelligible.
And the content was a sales pitch for certain male performance enhancing recreational pharmaceuticals.
Naturally, there was a link to a website that held the chemical answer to all of mankind’s ailments, or maybe just man’s ailments.
My immediate thought was, “You got hacked!”
Monday, September 13, 2010
Internet Explorer 8 Security Flaw Leaves Hotmail and Twitter Vulnerable
As if you needed another reason to move from Internet Explorer to Chrome or FireFox.
Apparently this new flaw is a variant of an older security hole that was noted as far back as December 2009. It exploits the way browsers like Internet Explorer 8 and Firefox handles something called CSS cross-site scripting
Apparently this new flaw is a variant of an older security hole that was noted as far back as December 2009. It exploits the way browsers like Internet Explorer 8 and Firefox handles something called CSS cross-site scripting
Friday, September 10, 2010
Detect Phishing Emails With These Online Apps
Email Phishing
While cleaning out my phishing email address, I came across several emails that were apparently from the FBI.

While they all appear to be from the same user, a robertmueller at fbi.gov, one of these emails came from someone on the Villanova campus. Apparently the sender forgot to modify one of the fields in their bulk email spamming software.
Tuesday, August 24, 2010
Dale Carnegie Sales Trainers - Make Your Blog Posts Easy To Find With These Two Tips
Here's another post for all of you Dale Carnegie trainers and sales reps using Blogger.
In the last tip we looked at how you could optimize the blog title for your particular business keyphrases. Next, we're going to take a peek at optimizing the title page of each individual blog post. But before we address how Blogger creates the actual posts titles, you need to verify that your blog is creating separate pages for each of your posts and not just appending your text to a monthly archive page.
Searching Through Dale Carnegie Blogs Reveals Two Different Blogger Structures
While cruising some of the your blogs in Blogger, I noticed that a few were behaving differently from the majority of the others. Take a look at the following. Click on any screenshot to enlarge:

This is the Dale Carnegie blog I created on Blogger for the last demo. We see the Blogger Title at point 1, the actual URL at point 2, and the Blog Title again at point 3. Everything looks good until we put the mouse over the first link, the post title, “Sales Presentation Tips For Sales People”.

Like we pointed out on the Laptop Security For Sales People blog, putting the mouse over any particular link you are interested in will reveal the destination URL down below in the browser's status bar, as seen at point 4.
Notice what happens when we click the link:

Notice how the title has changed in point 1. Remember that whatever is shown in the browser title bar is reflective of the changes in the Title Tag, one of the the things that the different search engines look at to determine what your page is about.
Now notice the change in the URL at point 2. That hash mark (#) indicates a specific place on the page that the browser positions at the top of viewing screen.
The post title at point 3 is the specific location on the page that the URL is pointing to and is now at the top of the page.
And if you look down at point 4, you will see the destination URL of the next blog post that my mouse is hovering over. Surprisingly, the only difference between the current blog post and the next blog post is the number after the hash (#) mark.
This is important because it means that all of my blog posts on this blog are here on the same page only at different locations.
See what happens when the next link is clicked:

Now the URL that was in the browser's status bar is now the current URL in the browser's address bar, shown in point 2.
The new blog post title has been moved to the top of the screen view, shown in point 3.
And my mouse is positioned over the next blog post which is revealed in the browser status bar at point 4.
The only thing that hasn't changed is the Title Tag which is revealed in the browser title bar, shown in point 1.
So, what does all of this mean?
If your Blogger blog is behaving like this, then it means you aren't optimizing your post titles and your blog to be found by the search engines.
And you aren't optimizing your post titles to leverage your marketable keyphrases that your potential clients are searching for.
While your main keyphrase, “Dale Carnegie” is still in the title of your blog and prominently visible to the search engines, no other keyphrases ever enter your titles. These are keyphrases are significant to your overall business, such as sales training or leadership training or communication skills.
So how do you optimize your blog posts to be found on the search engines?
How to Optimize Your Blogger Posts
First open your Blogger dashboard and click the “Settings” link.
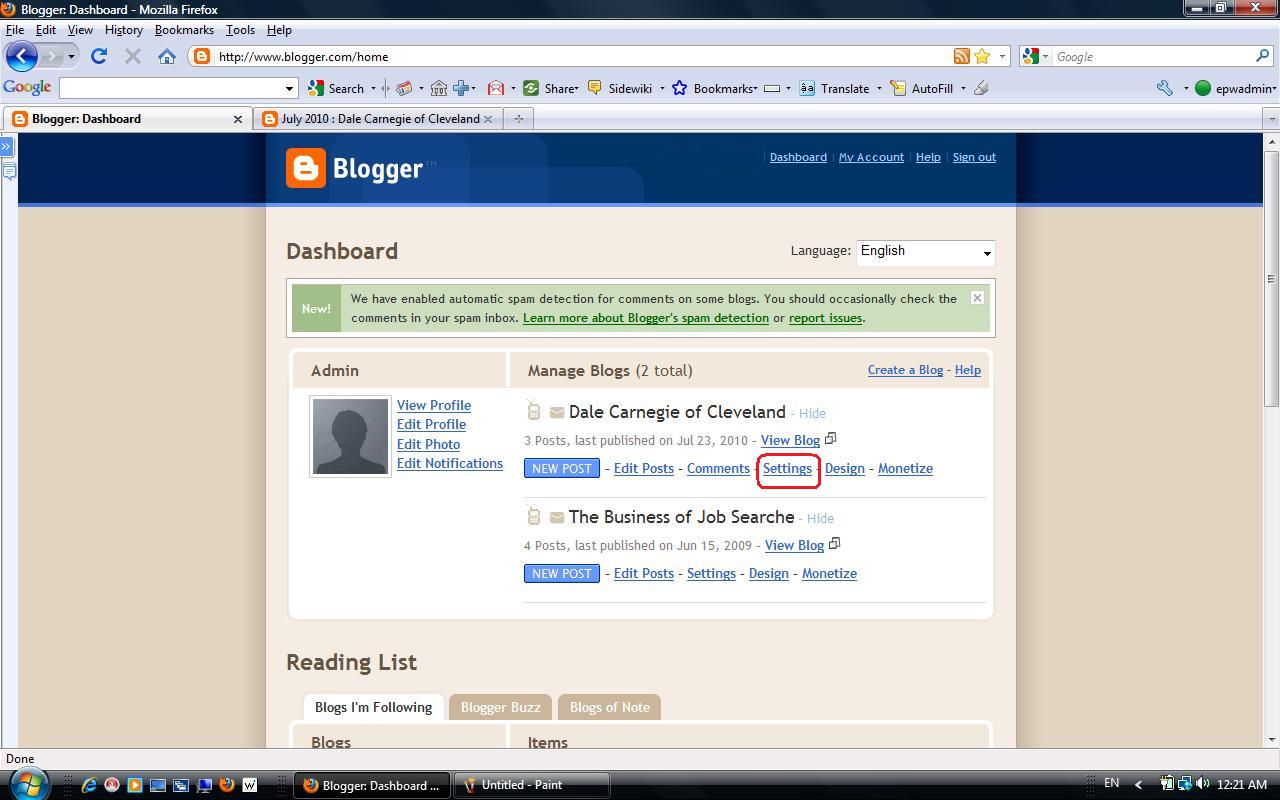
Then click the “Archive” link

The screen that comes up controls how blog posts are created in your blog. With the current structure, posts are grouped according to their creation date and appended to their respective pages. In this example, each page represents a month and holds all of the posts for that month. Naturally, the title of the page uses the date in its title.
Under the section entitled “Enable Post Pages?” changing the value in the drop down box from “No” to “Yes” will give each of your posts individual and unique web pages, each with their unique and individual titles. This will enable you to optimize each of your posts according to specific keyphrases.

Go ahead and change the value to “Yes” and then save the settings.

Blogger Posts As Separate Optimized Pages
Now, the main page of our Blogger blog looks like it did before. The title, the URL and the page title all looks the same as they did in the first screenshot with one exception.
Wen rolling the mouse over the title of the first post, the destination URL looks different as seen in point 4. There is no hash marks seen in the URL and it actually has some pretty sweet keywords and keyphrases included in its makeup.

Clicking a post title link that talks about communication provides a different kind of post page:

In point 1, we see that the the phrase included in the Title tags now actually includes keyphrases that are relevant to the post topic. Not only that, but the URL in point 2 also has some very useful keyphrases.
The title of the blog hasn't changed as seen in point 3. However, the title of the post seen in point 4, is now included in some other vital points in our blog structure.
So here are your next two tips:
- Change the way your Blogger blog sets up its posts pages and you'll increase your search engine exposure by increasing the number of Title Tags that the search engines can find.
- Include your keyphrases in your post titles and you'll start attracting more of the people looking for your specialized topics.
Incidentally, setting your posts up as separate pages also gives you some measure of control over your other meta tags as well. We'll take a look at that in a later post.
That’s all for this post. In the next post we'll take a deeper look at the post titles.
Click here and get RSS updates in your reader

or here to get them emailed to you.
Good Hunting!
Thursday, August 19, 2010
Identify Phishing And Spam Email Easily And Quickly
So you just received an urgent email telling you that you need to verify your Chase Account information.
Is it a legitimate request or is it an online phishing scammer trying to gain access to your online account information?
Is there a definitive method that you can use to distinguish legitimate email requests from online phishing scams?
Take a peek at this (simply click on a photo to expand it):
Is it a legitimate request or is it an online phishing scammer trying to gain access to your online account information?
Is there a definitive method that you can use to distinguish legitimate email requests from online phishing scams?
Take a peek at this (simply click on a photo to expand it):
Tuesday, August 10, 2010
Blogger Title Optimization Tip For Dale Carnegie Sales Consultants
Making Your Blogger Blog Easy To Find
As a Dale Carnegie Instructor or sales consultant updating a blog on Blogger, when we push that "publish" button and post our ideas on our blog, one of our objectives is to have someone on the Web read it and make use of the information we are providing.
- As trainers, we publish our posts so that our participants can have access to additional ideas and explanations on what we covered in a particular session.
- As sales consultants selling to a particular group of clients, we want to display how some of our other clients in a similar industry have gained specific benefits from some of the training programs that we offer.
- And as a franchise owner , we probably want to highlight some of the additional benefits of a new program that we are offering, like a one-day seminar on cold calling.
Whatever reason we are putting our thoughts out there on the Web, one thing is certain—we have a certain audience in mind when we created the post. And typically this audience is a group of people that we’ve done business with in the past. They know us, they’ve received email from us, or they received a phone call from us. They know wd exist and they know about our blog.
However, there is another audience that you can get our information to, and unfortunately, there’s a little more research and tweaking that needs to be done on Blogger before you can reach them.
These are the people that don’t know about you, they don’t know that you exist, and they’ve never heard a peep from you, ever. They’ve never received a phone call from you, never received an email from you, and they have never received any type of direct mail pieces from you.
But they get on one of the search engines every day and they search for topics regarding “Sales Training”, or “Leadership Training” or sometimes even, “Dale Carnegie Training”.
Factors That Impact Your Search Engine Visibility
When your clients go online and initiate their search for something like “Dale Carnegie Training”, typically they will turn to Google for assistance. They will type in something like “Dale Carnegie Training” or “Dale Carnegie Training in Cleveland” or “Dale Carnegie Training for sales people” and tell Google to go off and find all of the pages dealing with the subject of their particular search. These phrases are referred to as the keywords or keyphrases.
Now, no one knows for certain what factors are at play in Google’s algorithm except the people that work at Google. However there is a mountain of empirical data suggesting that certain things need to be on your pages to make them relevant for a particular search.
So, if someone is on their laptop and types “Dale Carnegie Training” into the Google search engine, the Google search engine will run off with the keyphrase, check it’s database of indexed pages, and see which pages are relevant for the term “Dale Carnegie Training”. It will then rank the results in order of importance before displaying the results to the end user.
What kinds of things does the Google Search Engine consider relevent when culling though its indexed database in search of pages that reference Dale Carnegie Training? Well, things like how many times the term “Dale Carnegie Training” is referenced in the body of the page. How close to the top of the page “Dale Carnegie Training” occurs. The number of other pages that link to the page.
And if “Dale Carnegie Training” is in the title of the page.
Think of it this way. If you were to go to the public library (yes, Amazon hasn’t chased them all away) and search for books dealing with “Dale Carnegie”, you would consider a book entitled “Dale Carnegie’s 30 Human Relations Principles”, or “Dale Carnegie’s Effective Speaking Strategy” to be highly relevant. However, you would consider a book entitled, “Great Public Speakers of the Early 20th Century” or “Giants in the Field of Professional Development” as less relevant to your search, even if there are some references to Dale Carnegie inside the book. The Google search engine will do something similar.
How To Make Your Blogger Blog Friendlier To The Search Engines
So here is your first tip.
If you want your blog to rank high for a keyword or keyphrase pertaining to your business, put the keyword or keyphrase in the title of your blog. In your case, if you want your blog to be relevant in searches for “Dale Carnegie”, put “Dale Carnegie” in your blog title.
Now do you absolutely need “Dale Carnegie” in the title? Well, you don’t have to put it in. But the keyword or keyphrase that you select should reflect the general topic and theme of your blog.
So if you were to create a blog that dealt specifically with the sales process, having the keyphrase, “Sales Strategy”, “Sales Tactics”, “Sales Cold Calling”, or “Sales Objections” might be the beginning of a useful set of keyphrase for you and one of those will be the start of a great title for your blog.
So how do you modify the title of your Blogger blog to contain your theme oriented keyphrase?
Glad you asked!
Check it out:

In this first frame, we see the standard Blogger dashboard when you log into your account and the number of Blogger blogs that you have control over. Here, I’ve created two test blogs, one specifically for all of you crazy Dale Carnegie Trainers and sales consultants to illustrate the point.

And here we see what the blog actually looks like. There are a couple of points to note here. When someone pulls up your web page or your blog, they will see the title reflected in (1) the browser title bar, (3) the current working tab, (5) the actual title on the blog, and (4) the taskbar menu button. The URL located in the address bar (2) is the actual web address of your blog. If you were in a hurry, like I was, then you probably created a blog with a URL that is the same or pretty similar to the title of your blog. This is ok unless you got in the game late and your title and URL are not reflective of the theme of your blog.

So head back over to the Blogger dashboard and hit the “settings” link. You are about to make a modification.

When you hit the “settings” link, the first section that comes up is the “basic” settings, which is good because this is where you want to make your change. The section that deals with the Title of your blog is the second entry. As you can see, the title of this blog is entered as “Dale Carnegie of Cleveland”. I’m going to change it to “Dale Carnegie of Akron”:

And hit the save button down below to save the change.
Now, refreshing the blog page yields:

Notice how the title of the blog has changed in (1) the browser title bar, (3) the active tab, (4) the taskbar button, although you can’t see it because it extends off of the button, and (5) the actual title of the blog. Also notice that the actual URL or web address of the blog (2) did not change. Like it or not, the web address you picked when you set up your blog is going to hang with you. But don’t worry. There plenty of other things to change that will help you in our quest to increase your blog’s visibility.
All of the changes you’ve seen in the browser depends on something in your blog called the title tag, which is also what Google looks for to determine your blog’s relevance to the phrase being searched. So if you want your blog to be relevant to Google when it begins to search for “Dale Carnegie Training”, putting this phrase in the title of your blog is the way to get it into the title tag of your blog and noticed by the search engines..
Now, will this make you immediately pop up on the first page of the search engine results pages? Probably not. There are a number of factors that Google uses to determine relevancy and we’ve only looked at one of those factors. But like I said, it’s a good start.
One more thing. Going back to the Blogger dashboard and looking at the basic section where we modified the blog title. You’ll see two drop down boxes:

These settings essentially allow your blog to be found in the Blogger blog roll and tell the search engines that you want them to index your blog.
If you make these “no”, your current clients can still find your blog because they know your blog address. It’s all of the other people, the ones that don’t know you exist but are searching for “sales training” or “leadership training” who won’t find you because you told the search engines not to consider your blog when the do their indexing.
So, seriously, you want these to be “yes”.
That’s it for now. Stay tuned for additional tips as they become available.
If you want automatic updates, click here and get RSS updates in your reader
or you can click here to get updates in your email.
Wednesday, July 28, 2010
Phishing With Chase As The Lure
This is a post I made back at the turn of the year, just prior to the Christmas holidays.
At the time, I had received several emails from… an organization that called itself Chase asking me to update my online credentials on their site.
At the time, I had received several emails from… an organization that called itself Chase asking me to update my online credentials on their site.
Malware Blog Boot For Sales People
The inaugural post for this site.
We’ll take a look at online security challenges including antivirus updates, phishing news, malware attacks and firewalls from a sales and marketing perspective.
These are things that system administrators and security people intuitively understand and address on a daily basis. But as sales people, we are usually tied up in generating revenue and don’t have time to review the latest malware news and stay up to date on the security bulletins to know when someone is trying to snooker us on a website or in an email.
Stay tuned, leave your ideas and let us know if you find something that looks like it’s buttering you up just to get your personal information or gain access to your laptop.
We’ll take a look at online security challenges including antivirus updates, phishing news, malware attacks and firewalls from a sales and marketing perspective.
These are things that system administrators and security people intuitively understand and address on a daily basis. But as sales people, we are usually tied up in generating revenue and don’t have time to review the latest malware news and stay up to date on the security bulletins to know when someone is trying to snooker us on a website or in an email.
Stay tuned, leave your ideas and let us know if you find something that looks like it’s buttering you up just to get your personal information or gain access to your laptop.
Monday, December 21, 2009
Did You Get Phished By Chase?
The holiday season is upon us. And with the usual holiday cheer and shopping rush, we can expect the usual host of… unsavory characters to make attempts at getting access to our online accounts and personal information.
It’s gonna happen so just expect to see it. I know I am.
I expect to see the email from an ebay participant telling me that they are anxious to complete the transaction and get the merchandise in question if I would just take the time and complete the conveniently provided form.
I expect to see the email from the “fake” Paypal company telling me that my account has been compromised and that I need to go to the account setup page to update my password. And they are even kind enough to provide a link to the page for my convenience.
I expect to get he occasional email from some “security professional” from a small bank telling me that my account has been compromised and that I need to use the supplied link to update my security credentials. Never mind the fact that I never heard of the bank let alone opened an account with them.
As the year draws to a close, more people will come under increased pressure between closing business at work and creating a memorable holiday event at home. Consequently, they won’t scrutinize those urgent and ominous looking email messages from “the bank” in their email inbox.
A Social Engineering Lesson From A Counterfeiter
When I was in college, one of the books that made the rounds in our class was an underground classic entitled “The Poor Man’s James Bond”. It was in the same class of books that included “The Anarchist’s Cook Book” so you can make a pretty good guess about some of the content.
I had obtained a copy of a copy of a copy, so you can imagine what the print quality and readability of this dog-eared document was like. Yeah, it was pretty ugly. There was one section, however, that was still in fairly good shape with no dropouts or additional markings, probably because it was the section that the past owners were the least interested in. This was the counterfeiting section.
I don’t remember all of the steps that the author outlined to create a passable counterfeit bill back then. In truth, I found it equally uninteresting and way too much work. However, I do remember the suggestions he made for passing one off.
His suggestion was to take the play money, roll it around in the dirt, and bake it in the oven to give it that well used look and feel. Then take it to a place of business during the busiest time of the day and buy something small with it. On checking out, get in the line manned by the greenest kid you can find with as many irate people as possible to make the purchase.
Now, when the counterfeiter is standing there with their dirty, smelly counterfeit $20 bill and a big smile, all the kid sees is a mile-long line of irate, rude people behind him. In an effort to get everyone out the door with as little drama as possible, the kid won’t put up much of a challenge to the counterfeiter.
I’m happy to say that measures have been implemented that make copying US bills extremely difficult if not impossible. But the social engineering piece is still out there and the phishers are making heavy use of the basic principles.
They are sending you email with official logos and lots of words implying urgency and importance in an effort to get you to react emotionally instead of responding logically.
They will do this at a time when they know you have will have lots of email from other companies making offers. And all of this will occur at a time when you are trying to juggle 7 different things while struggling under time and emotional pressures.
Email Phishing Example
Take this entry for example. Now I know that phishers have used banks in the past, but this is the first time I’ve seen them use bait this big.

As you can see, I’ve received what appears to be an urgent request from Chase asking me to update my security information (let's forget for the moment that I don't have an account with Chase, a dead give away that it's a phishing scam, and proceed with the usual shock and suprise). My guess is that the big oversized logo coupled with phrases like “site authorization”, “security”, and “strongly advise” will stir up some type of visceral response. The additional title of “Chase Security” is probably there to make me pay less attention to the name of the person encouraging me to change my security information. (John Edwards? Wasn’t he running for President of the US?)
They’ve even provided a convenient link for me to sign into my account.
Rolling the mouse of the link will give you the URL in the browser status bar (that bar down below that has the word “Done”). While I don’t have it shown here, the URL turned out to be a shortened URL, probably to hide the final destination. The URL was http//nuurl.us/97061.
Naturally, this thing stinks to high heaven. It has ‘phish’ written all over it. First there is the simple fact that I’ve received this email from a bank. Banks will never send out email regarding security. They may use email for marketing purposes and tell you about some new wonderful services they are about to unleash or some new shops where you can spend your money. But for any type of serious communication you can expect to get something in the USPS or a phone call. You can forget about email. They are wound way to tight for that.
Then there’s the URL, a masked URL that ultimately doesn’t go back to the Chase domain. Of course you can’t see where it goes until you click on it. But the very fact that it’s hidden is a very telling sign.
There are some other unspoken rules here as well. Nothing hard and fast, but it is something that I’ve observed. Banks are large corporations. As such, their IT department typically has a set structure when creating email accounts, and that structure is usually something like firstname.lastname@companydomain.com.
The other unspoken rule is the punctuation. Again, there is no hard and fast rule here on how someone in the banking industry should behave, but when was the last correspondence you got from a banker that had an exclamation point, let alone three? When someone in the financial industry is writing some type of correspondence, they tend to stick with the facts and figures. They leave little room for any emotional involvement. In general, if you get a correspondence from a bank punctuated with exclamation points, chances are it’s not from someone in the financial industry.
Now, clicking on this link results in the following:

So if you have the smartscreen filter turned on in IE8 (or Chrome or Firefox), you will see a screen similar to this. Congratulations! You’ve done your part to thwart the phishers.
However, with the smartscreen filter turned off, we see a page that looks like the following:


I imagine that Chase has a page somewhere that looks like this. The guys who are sending this one out probably just ripped off the template and modified it for their purposes. The phrase, “Chase.com Demo” is a giveaway.
Also look at the URL in the address bar. There is no reference to any legitimate business domain name, which is why the smartscreen filter kicked this thing to the skids.
The other thing here to notice is that this is not a secure connection. Anytime a web connection is transferring secure data, the connection will encrypt the data before it sends it. If the connection is secure, you will see something like the following:

This is for a Google Analytics account. The connection is secured using the https protocol. The quick way to tell if the connection is secure is to look for the “lock” at the top of the browser. If you don’t see the lock at the top and the site is requesting that you pass over secure or sensitive data like passwords or account numbers, it’s time to cut and run.
This site from “Fake Chase” is using the unsecured protocol, it isn’t locked down and it’s asking for secure information, like your User ID, the password to your Chase account, social security number…
And of course, no financial institution would ask you for this kind of information via email, ever. So don’t give it out.
This holiday season while you are out doing the “shop ‘til you drop” thing, remember that there are some unsavory characters who are also out there shopping… for you and your bank account numbers. Don’t let them get yours.
Stay vigilant.
Sunday, December 6, 2009
SEO Tip For Bloggers using Blogger
Today I discovered one of those Search Engine Optimization challenges that you know about but you don’t realize how it affects you until someone points it out.
In this case, Google pointed it out for me and it involved the blogging platform, Blogger.
Since I started using Blogger, I’ve been using the default font style when I create my posts. Then I would select certain blocks of copy, and sometimes all of it, and change the font style from the default Times Roman or Trebuchet, to Arial.
So imagine my surprise when, after looking at the Google Webmaster tools, it indicated that two of my major SEO keywords were “span” and “family”.
In looking at the code in the “Edit HTML” window, I saw a new “span” tag for every paragraph with text that I changed to a different font family.
Clearly, when considering Search Engine Optimization, the better way to change the overall font family for the body of the post is through the CSS.
With Blogger, the best way to do this is through the “Fonts and Colors” menu under the “Layout” tab. From there you can control a variety of variables like the “Page Background Color”, the “Blog Title Font” and “Post Text Font” to name a few.
And the modifications won’t interfere with your SEO efforts.
By using the “Fonts and Colors” menu under the “layout” tab, Google’s webmaster tools won’t show that your main SEO keywords are words that are actually a part of your site infrastructure. Then your Search Engine Optimization efforts can really make an impact.
Of course, if you are using one of the customized templates, you may have to modify the HTML before the Blogger platform will have access to the appropriate CSS variables. Just one more thing to be aware of.
Tuesday, November 24, 2009
Twitter Application Hootsuite Is Now A Social Network Communication Hub

Hootsuite Updated To Interface With LinkedIn And Facebook
Last night, I noticed that the 3rd party professional Twitter application Hootsuite went offline for maintenance. I really didn’t think much of it initially. Services like this go offline occasionally for routine maintenance and upgrades. But after 6 hours of not being able to connect to it, I knew something big was in the works.
Over the past few weeks, Twitter has made some major additions, one of them being the addition of lists. Professional Twitter desktop applications like Tweetdeck, and Seesmic recently made modifications to accommodate these updates, everything from the new way Twitter handles retweets to connecting with other social networks like Linkedin.
When Hootsuite came back online this morning, there were plenty of changes integrated into its structure. Now, not only does Hootsuite manages and organizes your Twitter lists, but it also interfaces to your Linkedin and Facebook accounts. This opens a host of possibilities which I’m sure we’ll explore in the coming weeks.
I’m sure that there were some other changes and upgrades integrated into Hootsuite to make it more stable and increase its flexibility. And I’m also fairly sure that there will be a few… surprises that we’ll stumble across as we move forward—you can’t make a major upgrade like this without a few oversights. But, these latest upgrades, coupled with some of the other features that were already integrated into the application, turns Hootsuite into a powerful social network communication platform.
You can find more descriptions of the Hootsuite upgrades on their blog here.
Monday, September 7, 2009
Free Social Media Icons For Your Blog
In a past post, I demonstrated how to acquire a badge from Linkedin and install the HTML code in your Blogger blog.
A number of you out there made good of that code and put it to immediate use.
Here’s what you need to know.
Facebook also offers a badge.
Plaxo offers a badge as well.
And Twitter gives you the opportunity to create a window into your tweets right on your blog.
The downside for some of these badges is that they take up a lot of real estate on your blog.
In perusing some of the other blogs out there and getting some insight from my friend Lewis Howes, I discovered a way to shorten down the badges into a few well recognized icons that will still allow your followers to follow you on your favorite social network.
For an example of what I’m talking about, see the sidebar on the right hand side with my social network connections on Linkedin, Facebook and Twitter. I’m still working on YouTube.
Before we talk about putting the connections into your Blogger blog, you will need to collect the social media icons. You can find these icons at a site called Iconspedia. These icons are subject to the creative commons license. While you can use them free of charge, don't alter the image as the logos belong to the respective companies. Still, for promoting your own personal brand and expanding your social networks, they can't be beat.
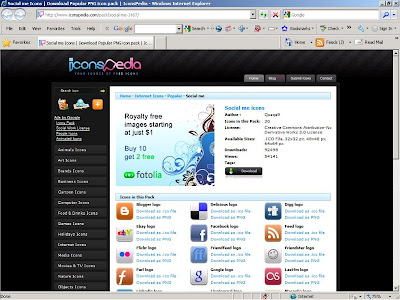
When you pull up the site, you’ll notice a bunch of different icon classes. The ones that we will use are the social media icons. You can find them by going to the catalog on the left-hand side and locating the “Internet Icons”. When clicked, it will expand to show your options. Click on the entry entitled “Popular” and then you will see a bunch of selections in the middle window pane.
The ones that we’ll use in the next blog post are in the “Social me” entry. Of course there are a number of other interesting entries and you can get innovative when creating the look and feel of your blog. What we will discuss can be transferred to any of the other icons.
But for now, hit the download button and you will begin downloading a zip file with all of the icons listed. For the “Social me” pack, that would be thirty, including icons for Linkedin, Twitter, Facebook and YouTube.
Be sure to place the zip file in a location where you will have easy access, and after it has finished downloading, go to the file location, double click the file and unpack the icons out of the zip file. This should be fairly straight forward, but if you have trouble, leave a message below and let me know.
You will end up with four variations of every icon: one file will be an ICO file type, and the other three will be of file type PNG in three different sizes, 32 pixels, 48 pixels, and 64 pixels wide.
The ones I’m using on the right side bar are 32 pixels wide.
Once you have these icons extracted, come back for the next post when we’ll look at how to put these into your Blogger blog with the appropriate social network.
Good Selling.
A number of you out there made good of that code and put it to immediate use.
Here’s what you need to know.
Facebook also offers a badge.
Plaxo offers a badge as well.
And Twitter gives you the opportunity to create a window into your tweets right on your blog.
The downside for some of these badges is that they take up a lot of real estate on your blog.
In perusing some of the other blogs out there and getting some insight from my friend Lewis Howes, I discovered a way to shorten down the badges into a few well recognized icons that will still allow your followers to follow you on your favorite social network.
For an example of what I’m talking about, see the sidebar on the right hand side with my social network connections on Linkedin, Facebook and Twitter. I’m still working on YouTube.
Before we talk about putting the connections into your Blogger blog, you will need to collect the social media icons. You can find these icons at a site called Iconspedia. These icons are subject to the creative commons license. While you can use them free of charge, don't alter the image as the logos belong to the respective companies. Still, for promoting your own personal brand and expanding your social networks, they can't be beat.
When you pull up the site, you’ll notice a bunch of different icon classes. The ones that we will use are the social media icons. You can find them by going to the catalog on the left-hand side and locating the “Internet Icons”. When clicked, it will expand to show your options. Click on the entry entitled “Popular” and then you will see a bunch of selections in the middle window pane.
The ones that we’ll use in the next blog post are in the “Social me” entry. Of course there are a number of other interesting entries and you can get innovative when creating the look and feel of your blog. What we will discuss can be transferred to any of the other icons.
But for now, hit the download button and you will begin downloading a zip file with all of the icons listed. For the “Social me” pack, that would be thirty, including icons for Linkedin, Twitter, Facebook and YouTube.
Be sure to place the zip file in a location where you will have easy access, and after it has finished downloading, go to the file location, double click the file and unpack the icons out of the zip file. This should be fairly straight forward, but if you have trouble, leave a message below and let me know.
You will end up with four variations of every icon: one file will be an ICO file type, and the other three will be of file type PNG in three different sizes, 32 pixels, 48 pixels, and 64 pixels wide.
The ones I’m using on the right side bar are 32 pixels wide.
Once you have these icons extracted, come back for the next post when we’ll look at how to put these into your Blogger blog with the appropriate social network.
Good Selling.
Saturday, August 22, 2009
Open Multiple Yahoo Accounts In IE8
Gaining Access To Multiple Yahoo Accounts Using IE8
OK. I logged into my second Yahoo email account recently. I typically login to my catchall account everyday to look at the spam, check email marketing samples, and look for anything of value that may find it’s way into the account. But I login to my “technical” account about once or twice a month.
For the longest time, if you had multiple Yahoo email accounts, you had to log out of the one that you had opened on your machine because Yahoo only allowed access to one email account per machine.
So before I could open a browser window and log into my Yahoo email tech account, I had to log out of my Yahoo catchall account, even if I had the “stay logged in” box unchecked.
Well, I made a mistake two days ago. I was on my laptop logged into my Yahoo email catchall account in IE8 and I opened a second IE8 window and opened the Yahoo site. To my amazement, it didn’t come up with my catchall account logged in.
Out of curiosity, I signed in to my Yahoo email technical account and it allowed me to do that. Furthermore, I was still logged in on my Yahoo email catchall account in the first IE8 browser.
What happened?
I mean, for the longest time, when IE7 was in full bloom and IE8 was nothing more than a sparkle in an engineer’s mind, I could only login to one Yahoo account per machine. Which meant that while I could open up multiple browsers and login to multiple Google accounts simultaneously, Yahoo only allowed me to login to one account on one machine regardless of the number of IE7 sessions I opened.
Now, my Yahoo accounts were behaving almost like my Gmail accounts.
First, I thought it was the new IE8 browser configuration that accounted for the change.
But that didn’t wash. I had another machine still running IE7 and I saw the same behavior on both configurations with Yahoo email accounts.
Then I thought that maybe it was because I also had Firefox and Chrome loaded on my test rig.
But that didn’t make sense either because I had no other browsers on my machine that was running IE7. My Yahoo email accounts still behaved like my Gmail accounts on both machines.
Eventually, I determined that regardless if I was running IE7, IE8, Firefox, or Chrome in combination with Windows XP, Windows Vista Ultimate or Vista Business, Yahoo mail was now behaving more like Google Gmail.
After much brain wracking and gnashing of teeth, I came to the conclusion that it was nothing that I had done. It was something that the good people at Yahoo had done.
Was it a result of the new portal look?
Did it happen after they killed off their personal blog and briefcase services?
Or maybe the team up with Microsoft had something to do with it.
I’m still waiting to hear something from the Yahoo team.
For now, know that if you configure your IE8 browser using the “nomerge” flag, your machine will handle multiple Yahoo email accounts the same way that if handles multiple Gmail email accounts.
Wednesday, June 17, 2009
Optimizing Blogger Titles For Keywords – Quick Tip For Increasing Your Blog’s Exposure
I came across this little tidbit while doing some other searches on the web concerning lead generation and cold calling.
If you are a sales person, an affiliate marketer or a job seeker, then you probably want to have your blog posts pop up on Google for certain keywords so prospects can take notice of your expertise.
Here are the variables of concern when you are using Google’s publishing tool, Blogger:
So what you find yourself confronted with is a sales engineering problem.
On the one hand, you can write up a page title with all of your keywords within the first 39 characters. The result will be a page name and a page title that will rank very high for your keywords. However, it will look really ugly to people and your audience will probably be more enticed to click on your competitors’ items instead of clicking your entry. And the title broadcasted in your feeds will not induce people to click and read your post either. So what good does it do to get top billing for your keywords if no one wants to click on your post?
On the other hand, you can write a title that looks really enticing to your reader base and makes them drool with anticipation when they see it. However, such language tends to induce a sense of mystery or incite a sense of shock and awe. Such language needs a little more freedom in word placement. The result is that some of your keywords may be placed beyond of the 39-character limit. Net result, your feeds will look enticing, but your organic placement will stink.
So you see the engineering dilemma. You can have very high placement with a title that doesn’t excite your audience very much, or you can have a title that makes your audience drool with excitement if they are willing to skip over to the 10th page of the search engine results.
So needless to say, when you create your Blogger post pages, you will have a little bit of work in front of you.
Here is another challenge. In Blogger, the title for all of your blog posts is preceded by the blog title!
Take a look at this:
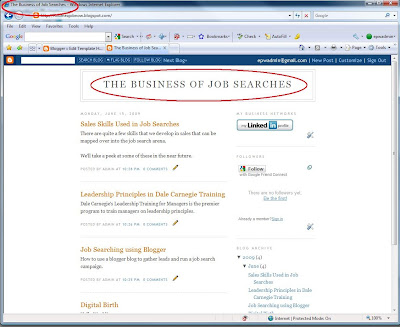
This is a test blog I created on Blogger with the title, “The Business of Job Searches”. Notice up on the title bar of the browser is the title of the page. This is typically the same text that’s in the HTML title tag. It's also what the search engines like Google are looking for when determining search relevance.
Notice what happens when I click on a post.
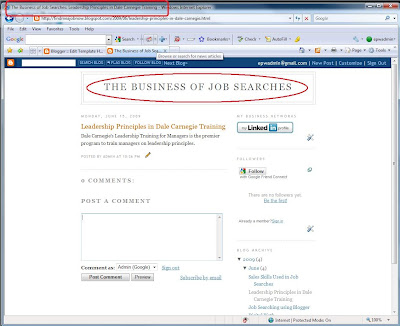
If my keyword is leadership, I should have good organic search results. The word “leadership” is first in my title putting it within the 39 character limit for Blogger page names and way up front in the title. However, notice what is on the browser title bar, “The Business of Job Searches: Leadership Principles in Dale Carnegie Training”
In order to have 100% relevancy as far as the title is concerned, my keywords must appear as the first word of the title. Relevancy will drop to below 60% for keywords that have fallen to the 4th position or further. So the further along in the title a word is located, the less relevant Google considers it. If what I see in the browswer title bar is what’s in my HTML title tag, then I’m in trouble. The relevancy for my keyword, leadership, is going to be below 60%. And it’s all because Blogger places the blog title first before the page title where all of my keywords are located.
I guess there’s some wisdom to having short blog titles.
Turns out that there is a way around this. But you’ll have to do some editing of the HTML that makes up the framework of your blog.
First, get to your Blogger dashboard. As you can see here, I’m back as the ‘EPW Test Dude’ with my blog I created back a few posts ago. Look, it even has 5 posts.
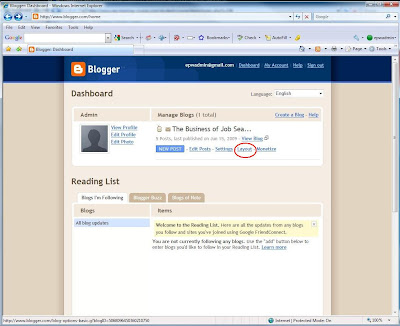
Go to the Layout section:
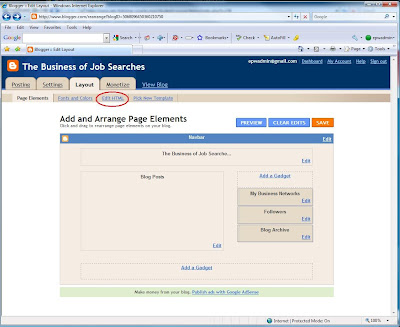
And then to the ‘Edit HTML’ section
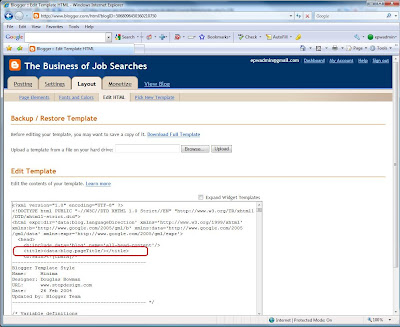
Now you’ll see some pretty ugly stuff. Don’t wig out. The piece that you want to edit is right there in front of you. You don’t have to scroll down or do any kind of search. The piece you want is the following:
This is the piece that essentially writes the blog page title right there in the HTML title tag and puts the title in the title bar of your browser.
What you want to replace that piece of code with is the following code:
What this piece of code essentially says is, “if the index page is pulled up, also known as the home page or the first page of your Blogger blog, then go ahead and use the blog title in the title of the page and inside the HTML title tags. Otherwise, put the blog post title down first, followed with a "vertical bar" and then with the blog title, stuff all of that inside the HTML title tags and use it as the title of the page.
The result looks like this:
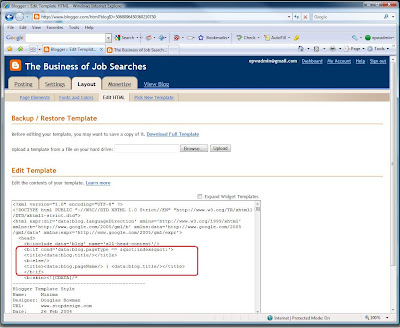
Save the template out by hitting the “Save Template” button below the edit box
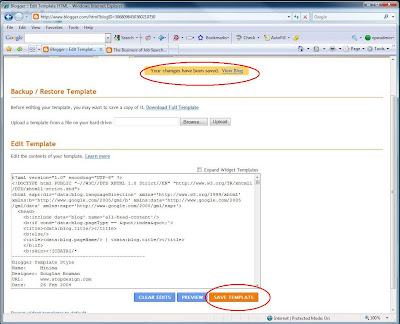
Now, when you go look your post, you will see a slight change:
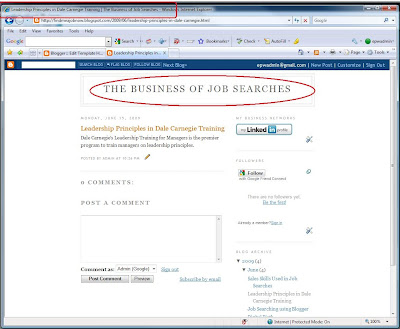
Notice that the blog post title is now first in the title and “Leadership” is now the first word in the title as well as in the page name.
It will take about a week for the results to make their way into the search engines, depending on how often you post and your current traffic. Of course, to increase it relevancy, we’ll have to add some text into the body of the post that has the word leadership. To make it really relevant, we’ll have to add some surrounding text that actually discusses leadership in a way that people find interesting. But for now, celebrate the fact that you now have some power over what’s getting placed in the title tags of your Blogger blog and possibly increasing your organic search results.
Kudos to the guys at Eblog Templates for finding this snippet of code and making it available -- and I’m sure that there are other, more exotic entries out there. I'll let you know as I find them. And I'll keep you updated on what kinds of changes I see in my search results.
If you are a sales person, an affiliate marketer or a job seeker, then you probably want to have your blog posts pop up on Google for certain keywords so prospects can take notice of your expertise.
Here are the variables of concern when you are using Google’s publishing tool, Blogger:
- Blogger uses the title of your post to create the page file name (the piece of the URL that is right that is between the “/” and the “.html”).
- When creating the page file name, Blogger limits the name to the first 39 characters.
- After you save the page out with the first page name, you can change the page title to something more catchy to grab people’s attention but it won’t change the page file name.
- Search engines look for keywords in the post title, the domain name and the page name, so when you first create your Blogger post, you need to have your keywords within the first 39 characters.
- Search engines also determine keyword relevancy by their location in the page title. So you also need to keep your keywords really close to the front of the page title in order to have high relevancy.
So what you find yourself confronted with is a sales engineering problem.
On the one hand, you can write up a page title with all of your keywords within the first 39 characters. The result will be a page name and a page title that will rank very high for your keywords. However, it will look really ugly to people and your audience will probably be more enticed to click on your competitors’ items instead of clicking your entry. And the title broadcasted in your feeds will not induce people to click and read your post either. So what good does it do to get top billing for your keywords if no one wants to click on your post?
On the other hand, you can write a title that looks really enticing to your reader base and makes them drool with anticipation when they see it. However, such language tends to induce a sense of mystery or incite a sense of shock and awe. Such language needs a little more freedom in word placement. The result is that some of your keywords may be placed beyond of the 39-character limit. Net result, your feeds will look enticing, but your organic placement will stink.
So you see the engineering dilemma. You can have very high placement with a title that doesn’t excite your audience very much, or you can have a title that makes your audience drool with excitement if they are willing to skip over to the 10th page of the search engine results.
So needless to say, when you create your Blogger post pages, you will have a little bit of work in front of you.
Here is another challenge. In Blogger, the title for all of your blog posts is preceded by the blog title!
Take a look at this:

This is a test blog I created on Blogger with the title, “The Business of Job Searches”. Notice up on the title bar of the browser is the title of the page. This is typically the same text that’s in the HTML title tag. It's also what the search engines like Google are looking for when determining search relevance.
Notice what happens when I click on a post.

If my keyword is leadership, I should have good organic search results. The word “leadership” is first in my title putting it within the 39 character limit for Blogger page names and way up front in the title. However, notice what is on the browser title bar, “The Business of Job Searches: Leadership Principles in Dale Carnegie Training”
In order to have 100% relevancy as far as the title is concerned, my keywords must appear as the first word of the title. Relevancy will drop to below 60% for keywords that have fallen to the 4th position or further. So the further along in the title a word is located, the less relevant Google considers it. If what I see in the browswer title bar is what’s in my HTML title tag, then I’m in trouble. The relevancy for my keyword, leadership, is going to be below 60%. And it’s all because Blogger places the blog title first before the page title where all of my keywords are located.
I guess there’s some wisdom to having short blog titles.
Turns out that there is a way around this. But you’ll have to do some editing of the HTML that makes up the framework of your blog.
First, get to your Blogger dashboard. As you can see here, I’m back as the ‘EPW Test Dude’ with my blog I created back a few posts ago. Look, it even has 5 posts.

Go to the Layout section:

And then to the ‘Edit HTML’ section

Now you’ll see some pretty ugly stuff. Don’t wig out. The piece that you want to edit is right there in front of you. You don’t have to scroll down or do any kind of search. The piece you want is the following:
<title> <data:blog.pageTitle/> </ title>
This is the piece that essentially writes the blog page title right there in the HTML title tag and puts the title in the title bar of your browser.
What you want to replace that piece of code with is the following code:
<b:if cond=’data:blog.pageType == “index”’>
<title><data:blog.title/></title>
<b:else/>
<title><data:blog.pageName/> | <data:blog.title/></title>
</b:if>
<title><data:blog.title/></title>
<b:else/>
<title><data:blog.pageName/> | <data:blog.title/></title>
</b:if>
What this piece of code essentially says is, “if the index page is pulled up, also known as the home page or the first page of your Blogger blog, then go ahead and use the blog title in the title of the page and inside the HTML title tags. Otherwise, put the blog post title down first, followed with a "vertical bar" and then with the blog title, stuff all of that inside the HTML title tags and use it as the title of the page.
The result looks like this:

Save the template out by hitting the “Save Template” button below the edit box

Now, when you go look your post, you will see a slight change:

Notice that the blog post title is now first in the title and “Leadership” is now the first word in the title as well as in the page name.
It will take about a week for the results to make their way into the search engines, depending on how often you post and your current traffic. Of course, to increase it relevancy, we’ll have to add some text into the body of the post that has the word leadership. To make it really relevant, we’ll have to add some surrounding text that actually discusses leadership in a way that people find interesting. But for now, celebrate the fact that you now have some power over what’s getting placed in the title tags of your Blogger blog and possibly increasing your organic search results.
Kudos to the guys at Eblog Templates for finding this snippet of code and making it available -- and I’m sure that there are other, more exotic entries out there. I'll let you know as I find them. And I'll keep you updated on what kinds of changes I see in my search results.
Thursday, June 4, 2009
Put A Linkedin HTML Signature In Gmail To Make Your Message Stand Out
While perusing my web stats, I noticed that a search kept coming up regarding how to put a LinkedIn button into an email signature, Gmail in particular.
I’ve seen these queries in the past and had even looked into putting some kind of LinkedIn button into the signature file of my Google Gmail messages. While there are email apps that will allow you to use html tags in the signature file, the one downfall of Gmail messaging is that it will only accept text characters in the signature box. It won’t accept HTML tags.
Today, however, I decided to take a quick spin on Google to see what was actually out there. And while I didn’t find a clean solution, I did find “A” solution and a Linkedin function that I had previously forgotten about.
However, this is truly a case of “buyer beware” because this workaround is more of a hack.
While it is simple to do and it will integrate your Linkedin signature with your outgoing Gmail message, this is not a push button configuration.
Here’s what I mean.
With your typical text signature, like the one you’ve typed into the Gmail signature box, the minute you hit the “compose message” button to create your next message, your signature file is automatically loaded into the body of the message before you even start typing.
You set the signature up once and you don’t have to worry about it ever again, until you are ready to change it.
With this particular hack, you have to install it every time you send off an email.
So if you have 15 emails to send off, this activity is what is commonly called overhead and it can be very high, significantly impacting your time management activities.
Do you want to do this activity every time you send out an email? Probably not.
But if you are trying to impress a client, or if you want to push your LinkedIn profile to encourage your certain clients and prospects to connect with you, this could be a useful hack.
Still game? Then read on.
Turns out that some email apps will allow you to compose a rich signature file. Unfortunately, Gmail is not on that list. Gmail doesn’t support HTML tags in the signature file – yet. However, Gmail will allow you to drag and drop HTML objects into the compose pane. So you can create an email signature that looks real nice in LinkedIn, highlight the whole object, copy it and then past it into the body of the Gmail message.
First, get the signature.
Log into your Linkedin account and scroll down to the bottom of the page:
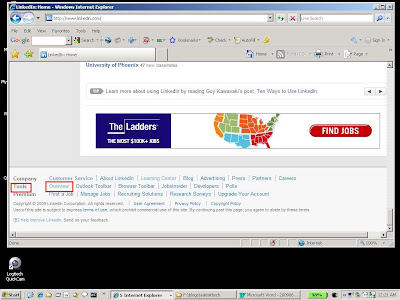
When you get to the bottom, you will see menu items that are more utilitarian. You want the “overview” link under the “Tools” heading. This will take you to the Linkedin Tools overview page. On this one, get down to the “email Signature” section and hit the “Try it Now” button:
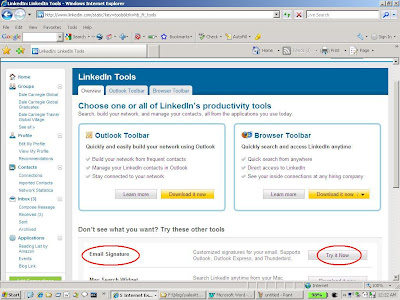
When you hit the “Try it Now” button, you will be taken to the “Create Email Signature” page where you will have an opportunity to create your signature.
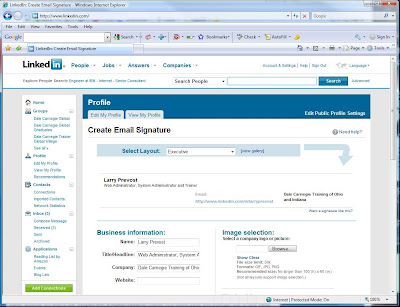
Linkedin provides several layouts that you can choose from.
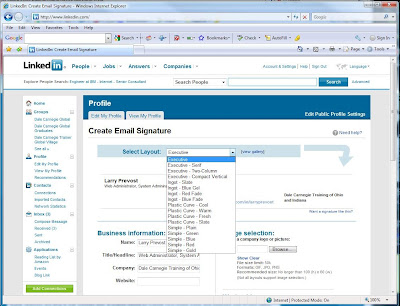
Select your layout that you like. Linkedin will also backfill some of the information, like your name, headline and company. But you will need to supply some additional information like phone number, the address or your company’s website, any additional websites that you have, and your company’s address.
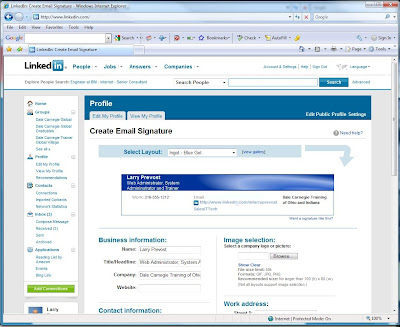
Once you have it set up the way you want, you can transfer it over to your Gmail message.
In another browser window, open our Gmail account. Here we again are using our old standby, the EPW Test Dude.
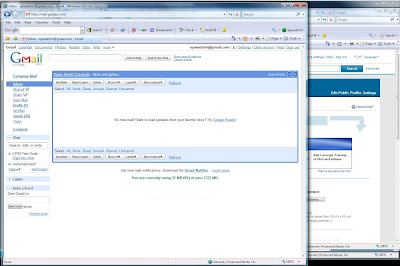
Go ahead and compose your message as you normally would:
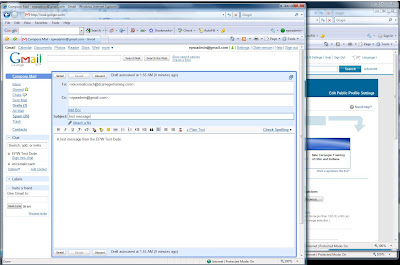
When you have your message composed, go back to the browser holding your Linkedin session and highlight the signature that you just made:
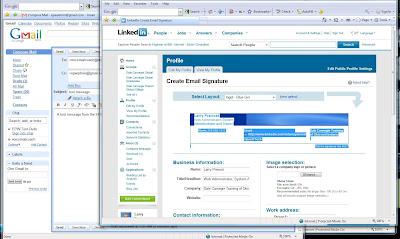
Then, copy the highlighted section:
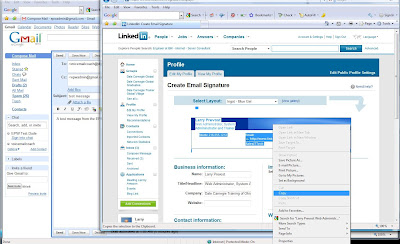
And then paste it into the body of the message that you have finished composing in your Gmail browser window:
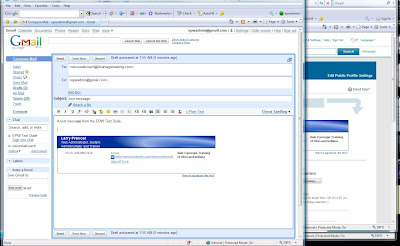
Then, it just a matter of sending it off. When it arrives, it will look something like this:
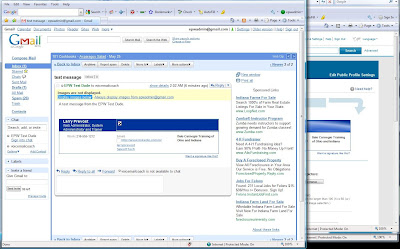
You’ll notice the funny little boxes in place of the missing graphics. The graphics aren’t gone. They just aren’t being displayed. As with most email programs, the default setup is to not display graphics, so count on your recipient not initially seeing your pictures. However, by merely clicking the link “Display images below” you can make the app display them.
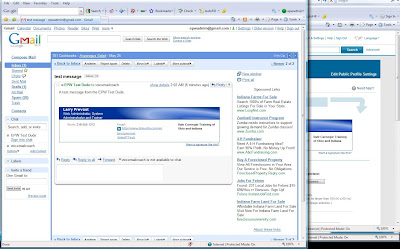
See?
Quick, simple and easy.
However, this is by no means automated. So as I said at the top of this post, you’ll have to repeat the process for every email that you want to send out with the Linkedin profile signature. Not exactly the most heartwarming of thoughts, but it is possible to include a Linkedin profile in our outgoing email.
Kudos to Amit Agarwal at Digital Inspiration for discovering the hack.
I’ve seen these queries in the past and had even looked into putting some kind of LinkedIn button into the signature file of my Google Gmail messages. While there are email apps that will allow you to use html tags in the signature file, the one downfall of Gmail messaging is that it will only accept text characters in the signature box. It won’t accept HTML tags.
Today, however, I decided to take a quick spin on Google to see what was actually out there. And while I didn’t find a clean solution, I did find “A” solution and a Linkedin function that I had previously forgotten about.
However, this is truly a case of “buyer beware” because this workaround is more of a hack.
While it is simple to do and it will integrate your Linkedin signature with your outgoing Gmail message, this is not a push button configuration.
Here’s what I mean.
With your typical text signature, like the one you’ve typed into the Gmail signature box, the minute you hit the “compose message” button to create your next message, your signature file is automatically loaded into the body of the message before you even start typing.
You set the signature up once and you don’t have to worry about it ever again, until you are ready to change it.
With this particular hack, you have to install it every time you send off an email.
So if you have 15 emails to send off, this activity is what is commonly called overhead and it can be very high, significantly impacting your time management activities.
Do you want to do this activity every time you send out an email? Probably not.
But if you are trying to impress a client, or if you want to push your LinkedIn profile to encourage your certain clients and prospects to connect with you, this could be a useful hack.
Still game? Then read on.
Getting The Linkedin HTML Signature
Turns out that some email apps will allow you to compose a rich signature file. Unfortunately, Gmail is not on that list. Gmail doesn’t support HTML tags in the signature file – yet. However, Gmail will allow you to drag and drop HTML objects into the compose pane. So you can create an email signature that looks real nice in LinkedIn, highlight the whole object, copy it and then past it into the body of the Gmail message.
First, get the signature.
Log into your Linkedin account and scroll down to the bottom of the page:

When you get to the bottom, you will see menu items that are more utilitarian. You want the “overview” link under the “Tools” heading. This will take you to the Linkedin Tools overview page. On this one, get down to the “email Signature” section and hit the “Try it Now” button:

When you hit the “Try it Now” button, you will be taken to the “Create Email Signature” page where you will have an opportunity to create your signature.

Linkedin provides several layouts that you can choose from.

Select your layout that you like. Linkedin will also backfill some of the information, like your name, headline and company. But you will need to supply some additional information like phone number, the address or your company’s website, any additional websites that you have, and your company’s address.

Once you have it set up the way you want, you can transfer it over to your Gmail message.
Bringing over your Linkedin Signature over to your Gmail Message
In another browser window, open our Gmail account. Here we again are using our old standby, the EPW Test Dude.

Go ahead and compose your message as you normally would:

When you have your message composed, go back to the browser holding your Linkedin session and highlight the signature that you just made:

Then, copy the highlighted section:

And then paste it into the body of the message that you have finished composing in your Gmail browser window:

Then, it just a matter of sending it off. When it arrives, it will look something like this:

You’ll notice the funny little boxes in place of the missing graphics. The graphics aren’t gone. They just aren’t being displayed. As with most email programs, the default setup is to not display graphics, so count on your recipient not initially seeing your pictures. However, by merely clicking the link “Display images below” you can make the app display them.

See?
Quick, simple and easy.
However, this is by no means automated. So as I said at the top of this post, you’ll have to repeat the process for every email that you want to send out with the Linkedin profile signature. Not exactly the most heartwarming of thoughts, but it is possible to include a Linkedin profile in our outgoing email.
Kudos to Amit Agarwal at Digital Inspiration for discovering the hack.
Subscribe to:
Posts (Atom)